Why Use a Kiln?
Many woodturners utilize the twice-turned method to produce bowls – the bowl is rough-turned with thick walls while the wood is still green (wet), and then it is allowed to dry before the bowl is remounted on the lathe and turned down to it’s finished thickness and shape. (The walls are left thick – typically 10% of the diameter – because the bowl will warp as is drys. So the extra thickness allows the bowl to be turned round again.) This drying process can take anywhere from six month to a year or more, depending on the species and other factors.
In order to speed the drying process, some woodturners use a kiln. A common DIY method I’ve seen is to re-purpose an old refrigerator or freezer. A few holes are drilled in the top and bottom, the wire shelves provide a place to stack rough bowls, and a single incandescent light bulb is used as the heat source. Through natural convection, air flows in through the holes in the bottom and out the holes in the top. A relatively constant temperature is maintained inside, typically 95-120º F. This can be tweaked by changing the size of the light bulb (e.g., 40 watt vs. 60 watt vs. 75 watt) and/or by the size and number of holes.
My initial reason for considering a kiln, however, was not for drying rough-turned bowls – although I will certainly use it now for bowls that need to be completed sooner than normal drying would allow. No, my initial thought was to use it to accelerate curing of the food-safe finishes I use on my bowls. I primarily use Tried & True Danish Oil and Tried & True Varnish Oil on my bowls. Tried & True’s Danish Oil – unlike other “Danish” oils on the market – is pure, polymerized linseed oil. Their Varnish Oil is also pure, polymerized linseed oil, with a natural resin added to enhance durability. My typical regime is to apply two coats of the thinner Danish Oil, followed by one or two final coats of the Varnish Oil. Since Tried & True’s linseed oil is highly polymerized, drying time is only 1-2 days, as opposed to two weeks or more for pure, raw linseed oil. (I never use “Boiled” linseed oil for anything that will see food contact, as it contains petroleum-based solvents and metallic drying agents.) So even though Tried & True’s finishes cure relatively quickly, rather than wait 48 hours between coats, I knew that exposure to elevated temperatures would greatly decrease that time. In fact, just leaving a bowl in the kiln overnight is all that is needed before proceeding to the next coat.
Components for the Kiln
I wanted a kiln that was relatively compact, light-weight, and portable. An old refrigerator is pretty much the opposite of light-weight and portable. So instead I built my kiln around a commonly available wire shelving unit on castors. I found one on Amazon that seemed like a good size for me for $40 and free Prime shipping. It’s 36″ wide x 14″ deep, and 58″ high with the castors. These come in many sizes, so you could build a bigger or smaller kiln to suit your needs.
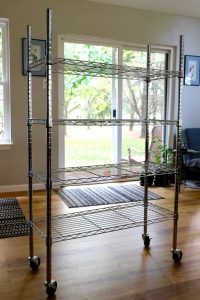
These shelving units are commonly available in chrome finish or black powder-coat. I opted for the chrome because I wasn’t sure how the black powder-coat paint would hold up under elevated temperatures. It would probably be fine, but why risk it? The unit comes with four industrial-style 3″ rubber castors, two of them with locking levers.
Notice in the photo that I oriented the shelves in a non-typical manner, so that there is a space at the bottom and a space at the top. Shelves at the very top and bottom would have been unnecessary and a waste of shelves, as you will see.
The shelving unit provides the “framework” for the kiln, and enclosing it is a relatively simple matter. For this I used sheets of 1/2″ thick foam insulation board, commonly available at Lowe’s, Home Depot, or other building supply outlets. These come in 4′ x 8′ sheets and one side is lined with reflective foil. (They are also available in 1″ thickness, but that would be over-kill and added expense, and their added thickness would make them more difficult to join together.) For the shelving unit I selected, I required two sheets of foam board.
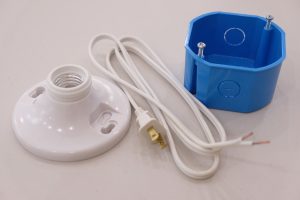
The other items you will need are a simple light fixture, a round electrical box, an electrical cord and plug (I used one salvaged from an old small appliance), a section of 1/4″ plywood, duct tape, cable ties, and miscellaneous hardware. The light fixture and electrical box cost me $3.29 total at Lowe’s. The other items I had on hand.
Cutting and Drilling the Parts
To build the kiln, start at the bottom. Cut a piece of 3/8″ or 1/2″ plywood that is 1″ longer and 1″ wider than the shelves, as measured at their longest/widest points. (In other words, measure at the corners where the “tubes” are welded on, as these protrude slightly from the edges of the shelf proper.) This will give you a plywood “shelf” that has a 1/2″ ledge all the way around. We need to mark the plywood to drill four holes for the support posts to pass through. So with the wheels removed, set the shelving unit on the piece of plywood. Position it so that the support posts are equally spaced from the edges, and then use a pencil to draw circles around the posts.
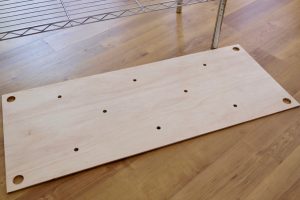
I used a 1-1/8″ Forstner bit on my drill press to drill these. Be sure to place a piece of scrap underneath to prevent tear-out. While you’re at it, mark out where you want the ventilation holes and drill those, too. I drilled eight holes with a 1/2″ Forstner bit, as you can see in the photo.
This piece of plywood will support the foam board on the bottom of your kiln. You will also use it as a template to lay out the top and bottom pieces of foam board. The bottom will be exactly the same, whereas the top will only have the ventilation holes – not the larger corner holes.
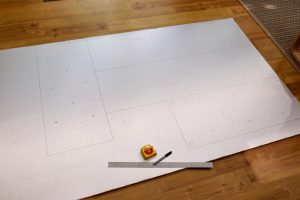
It’s hard to see in the photo, but I used a Sharpie to mark out the sides, top, and bottom on the first sheet of foam board. As mentioned above, use the piece of plywood you already cut and drilled as a template for the top and bottom, and remember, the top only has ventilation holes. When assembled, the plywood will rest on top of the castors, so to determine the length of the sides, measure from the top of the castor to the top of one of the vertical support posts, and then subtract the thickness of the plywood + the thickness of the foam board. I my case, this was 54-3/16″ – 3/16″ (plywood thickness) – 1/2″ (foam board thickness) = 53-1/2″. If in doubt, add an extra 1/4″ to 1/2″ in length – you can always trim it to fit later, or you could leave it slightly proud of the top of the posts.
Notice in the photo how I oriented the two sides, top, and bottom to cut out on the sheet: the piece that will be the top (on the left) could have been oriented horizontally, but then I wouldn’t have had a large enough section of foam board remaining, which will be needed later. Once measured and marked, cut out the pieces with a utility knife. I used a 4′ aluminum straight edge with a utility knife to make nice straight cuts, and placed a scrap of plywood underneath to protect the floor. The foam board cuts easily, but I suggest doing it in two passes so you don’t have to press down so aggressively. Use a another scrap of plywood, foam board, or a kneeling pad when working on top of the foam board, or else your knees will damage it.
I used Forstner bits to drill the foam board. It’s soft and easy to drill, but start slowly and use a backing board so it doesn’t get mangled. The front and back pieces of foam board are sized to the respective openings, so before cutting those out, let’s do a little assembly…
Assembling the Kiln
Lay the shelving unit down (or turn it upside-down) and slide the bottom piece of foam board over the support posts, with the foil side facing in. Then slide the piece of plywood over the posts, and then screw in the castors. Place the two castors with locking levers on the side that will be the front for easy access. Now place the shelving unit upright. It should look something like this. (see photos)
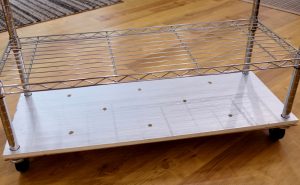
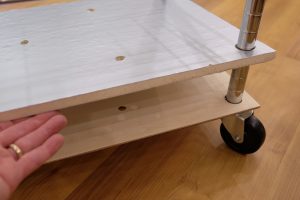
The only thing I plan to put on the bottom shelf is the “heater”, so the 3/8″ plywood combined with the foam board is strong enough to support the weight. If you wanted to utilize this shelf for drying bowl blanks, I would use 1/2″ plywood instead. If you DO place pieces to dry on the bottom shelf, be sure to keep them a safe distance from the heater and do not block the ventilation holes!
Now let’s attach the sides and top. If you set the side pieces on the edge of the bottom foam board, they should be flush or a little proud of the top of the posts. After checking this, before proceeding, take a moment to “seal” the front edges of the two sides and top with duct tape. It’s easier to do this now rather than after the pieces are attached to each other. (Don’t ask me how I know this.) Note: don’t skimp on the duct tape. If you don’t seal the open edges of the foam board, it will quickly chip and tear. Also, it provides friction to help keep the “door” in place later.
Place the top piece on top of the two sides. Be sure the sides and top have the foil facing inward. A helper would come in handy here. Align all the edges flush front and back, and tack them in place with small pieces of duct tape.
Place two 2×4 scraps between the bottom piece of foam board and the plywood to raise the foam board up a couple inches. Then using the duct tape, attach the sides to the bottom. Tape approximately 1/2″ of the tape to the side piece, and then wrap it down over the edge of the bottom and secure it underneath.
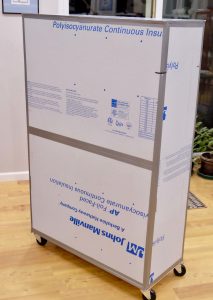
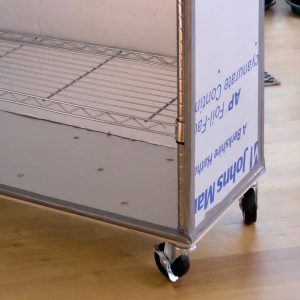
Also, while the bottom is elevated, seal the front edge of the bottom foam board. (Again, this would be easier to do before assembling the bottom shelf.) Once the sides are attached to the bottom, remove the 2×4’s and attach the top to the sides in the same manner. Your seams should look something like this. (see photos)
After the sides are attached to the bottom, and the top attached to the sides, you can go ahead and measure the exact size you need for the back. I elected to use one solid piece of foam board for the “door”, so that meant the back would need to be constructed from two pieces – one from the first 4′ x 8′ sheet of foam board, and one from the second. Joining two pieces is a simple matter of butting the edges together and taping on both sides.
The Door
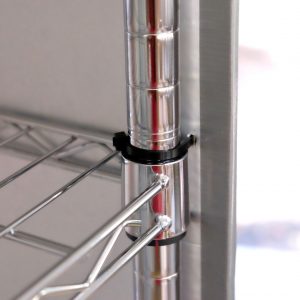
At this point, the main structure of your kiln should be pretty much complete. If the foam board is not completely snug to the shelving unit in spots, use cable ties to secure it. To do this, simply poke two small holes through the foam board on either side of a support post, and then loop the cable tie through and around the post.
Fashioning a door or doors for the kiln posed a dilemma. Since there’s no wooden frame, there’s no way to attach hinges. And even if there were, how would you attach the hinges to the piece(s) of foam board that you use for the door? Screws will not hold in foam board. Bolts would tear out under the weight. In the end, I decided the best solution was the simplest: make a single, one-piece door that is held in place by a snug friction fit.
In hind-sight, I now wish I had cut the sides, top, and bottom all an inch wider so that they would protrude 1.5″ from the front of the shelving unit. As they are now, they are 1/2″ proud of the shelves, so when the door is in place, it’s flush with the edges of the sides, top, and bottom. If there was an extra inch there, the door would sit in the recess easier and I could insert small pegs or use small spring clamps to secure the door if necessary. So if you’ve read this far, consider allowing a little extra width on those parts, assuming there’s enough room on the foam board sheet.
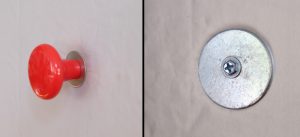
So, measure the opening for the door and cut it out from the second sheet of foam board. Seal all four edges with duct tape. I attached two old drawer knobs that I had so it’s easier to maneuver the door. When you do this, be sure to use large fender washers, or else they will tear right through the foam. (see photo) If you measured and cut accurately, your door should have a snug friction fit. Because the foam board is so light, this should be sufficient. If you allowed a little extra on the front edges of the kiln, even better.
The Heater
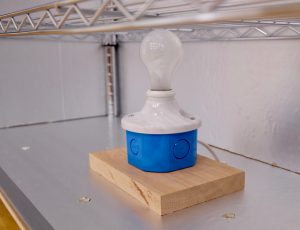
It’s common for DIY kilns to simply use a single incandescent light bulb as the heat source. Depending on the size of the light bulb, the size of the kiln, and the number of ventilation holes, the temperature should hold fairly constant at 95-120º F. I started out using a light bulb, as shown in the photo, however the light bulbs kept burning out after 1-2 weeks of being on 24/7. So I replaced the light bulb with a ceramic infrared heat lamp bulb. These are typically used to keep baby chicks, iguanas, and other small animals warm, and they last much longer than a light bulb. These run very hot, however, so be sure to pair it with an inline voltage regulator / thermostat to maintain the desired temperature. Another option, without the thermostat, would be one of these, which is similar to the one I have. Just experiment with the setting until the temperature is holding where you want it.
As I mentioned earlier, the light fixture and round junction box cost $3.29 total at Lowe’s, and I used a power cord that I already had in stock, salvaged from an old small appliance or lamp.
The wiring required is very basic, but beyond the scope of this article. If you are not comfortable with basic wiring, please consult someone who is. Just a couple safety points I’ll note:
- Be sure to use a knock-out clamp connector for strain relief where the power cord goes through the hole in the junction box. These are inexpensive, but very important for safety. Check the size of the knock-out holes on your junction box to be sure you purchase the correct size.
- The hot wire (connected to the smaller blade on the plug) should be connected to the brass screw of the fixture, and the neutral wire is connected to the silver screw.
- Attach the junction box to a substantial piece of wood for weight and stability. (see photo) I used a scrap piece of oak lumber.
- Be sure you have sufficient ventilation holes in the top and bottom of your kiln. This is very important because you want a constant air flow through the kiln to allow the moisture coming off the wood to be able to flow out, while fresh dry air flows in. Convection keeps air flowing in through the bottom holes and out the top. NOTE: I have since added a 2″ computer fan, inset into a small hole I cut into the top. These are inexpensive and can be wired to a DC power adapter. I will add photos later…
- Be sure not to block the ventilation holes. Do not place wood too close to the light bulb, or directly above it.
To monitor the temperature inside the kiln, an inexpensive, stainless steel probe thermometer can be stuck right through the foam in a convenient spot. However for just a couple dollars more, I recommend a digital indoor thermometer that also shows the relative humidity. I currently have both options, because I had both on hand. I have the digital thermometer sitting on the top shelf, positioned so that I can see it by peeking down through one of the ventilation holes.
Conclusion
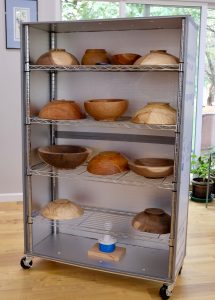
Having a small kiln available can can greatly decrease the time needed to drive out moisture in bowl blanks and other lumber. Woodturners are not the only craftspeople who could benefit from a kiln. Windsor chair makers and spoon carvers also work with green wood, and might find that a kiln would be a great time-saver.
Using a wire shelving unit on castors and foam insulation board, I was able to build an effective, low cost, light-weight, portable kiln. For less than $70 in parts and materials, my kiln was up and running in a weekend. The design allows significant flexibility, as the wire shelving units come in a myriad of sizes. So you can build a kiln to suite your particular space and needs, and easily roll it out of the way if required. And down the road, if you decide you longer need a kiln, you still have a nice shelving unit. 😉
UPDATE: I initially used 1/4″ plywood for the bottom shelf, and it has started to sag slightly from the weight of the heater. I have simply placed an appropriately sized block of wood underneath to level it out. But I now recommend using at least 3/8″ plywood for the bottom.